

You're standing in front of the mirror ten minutes before a significant event, your suit looks sharp, but your tie is a tangled mess that's either too short or lacks that crisp, professional dimple. Most Kiwi men have been there, and learning how to tie a tie shouldn't be a source of pre-event stress. It's frustrating when you've invested in a quality business suit or a wedding ensemble only to feel let down by a lopsided knot that doesn't quite sit right against your collar.
At Frank Casey, we've helped thousands of New Zealanders look their best for life's biggest moments, and we know that the right knot is the final touch that builds true confidence. Our guide provides expert, step-by-step instructions to help you achieve a professional look every time, regardless of your experience level. You'll master the essential techniques with ease and precision, ensuring you look the part for any black-tie gala or school ball.
You'll learn the three classic knots essential for 2026, from the versatile Four-in-Hand to the formal Full Windsor. We also include professional styling advice on matching your knot to your suit's collar and ensuring your tie length is perfect for your height.
Key Takeaways
- Master the Four-in-Hand knot for a quick, versatile look that suits almost any semi-formal Kiwi event.
- Discover when to use the sophisticated Half Windsor or the authoritative Full Windsor for your next black-tie wedding or school ball.
- Learn exactly how to tie a tie with step-by-step instructions that guarantee a crisp, symmetrical result every time.
- Understand how to match your knot size to your shirt collar to ensure your outfit looks balanced and professional.
- Perfect your presentation by learning how to create the signature dimple and achieve the ideal tie length at the centre of your belt.
The Four-in-Hand Knot: The Simple Choice for Every Occasion
The Four-in-Hand is the quintessential starting point for any man. It's the oldest known necktie knot and remains the most popular due to its sheer versatility. While some online tutorials promise you can master how to tie a tie in ten seconds, the Four-in-Hand actually delivers on that promise without sacrificing style. It's a staple in any comprehensive list of knots because it works with almost any tie fabric and collar style.
This knot is famously asymmetrical and slightly smaller than its Windsor cousins. Its slender shape makes it the perfect partner for standard button-down collars and narrow ties. If you're heading to a casual wedding on the coast or prepping for a school ball, this is your reliable, go-to option. It doesn't overwhelm your frame, making it especially flattering for those with a slimmer build.
Step-by-Step Instructions for the Four-in-Hand
Follow these steps to achieve a clean finish every time.
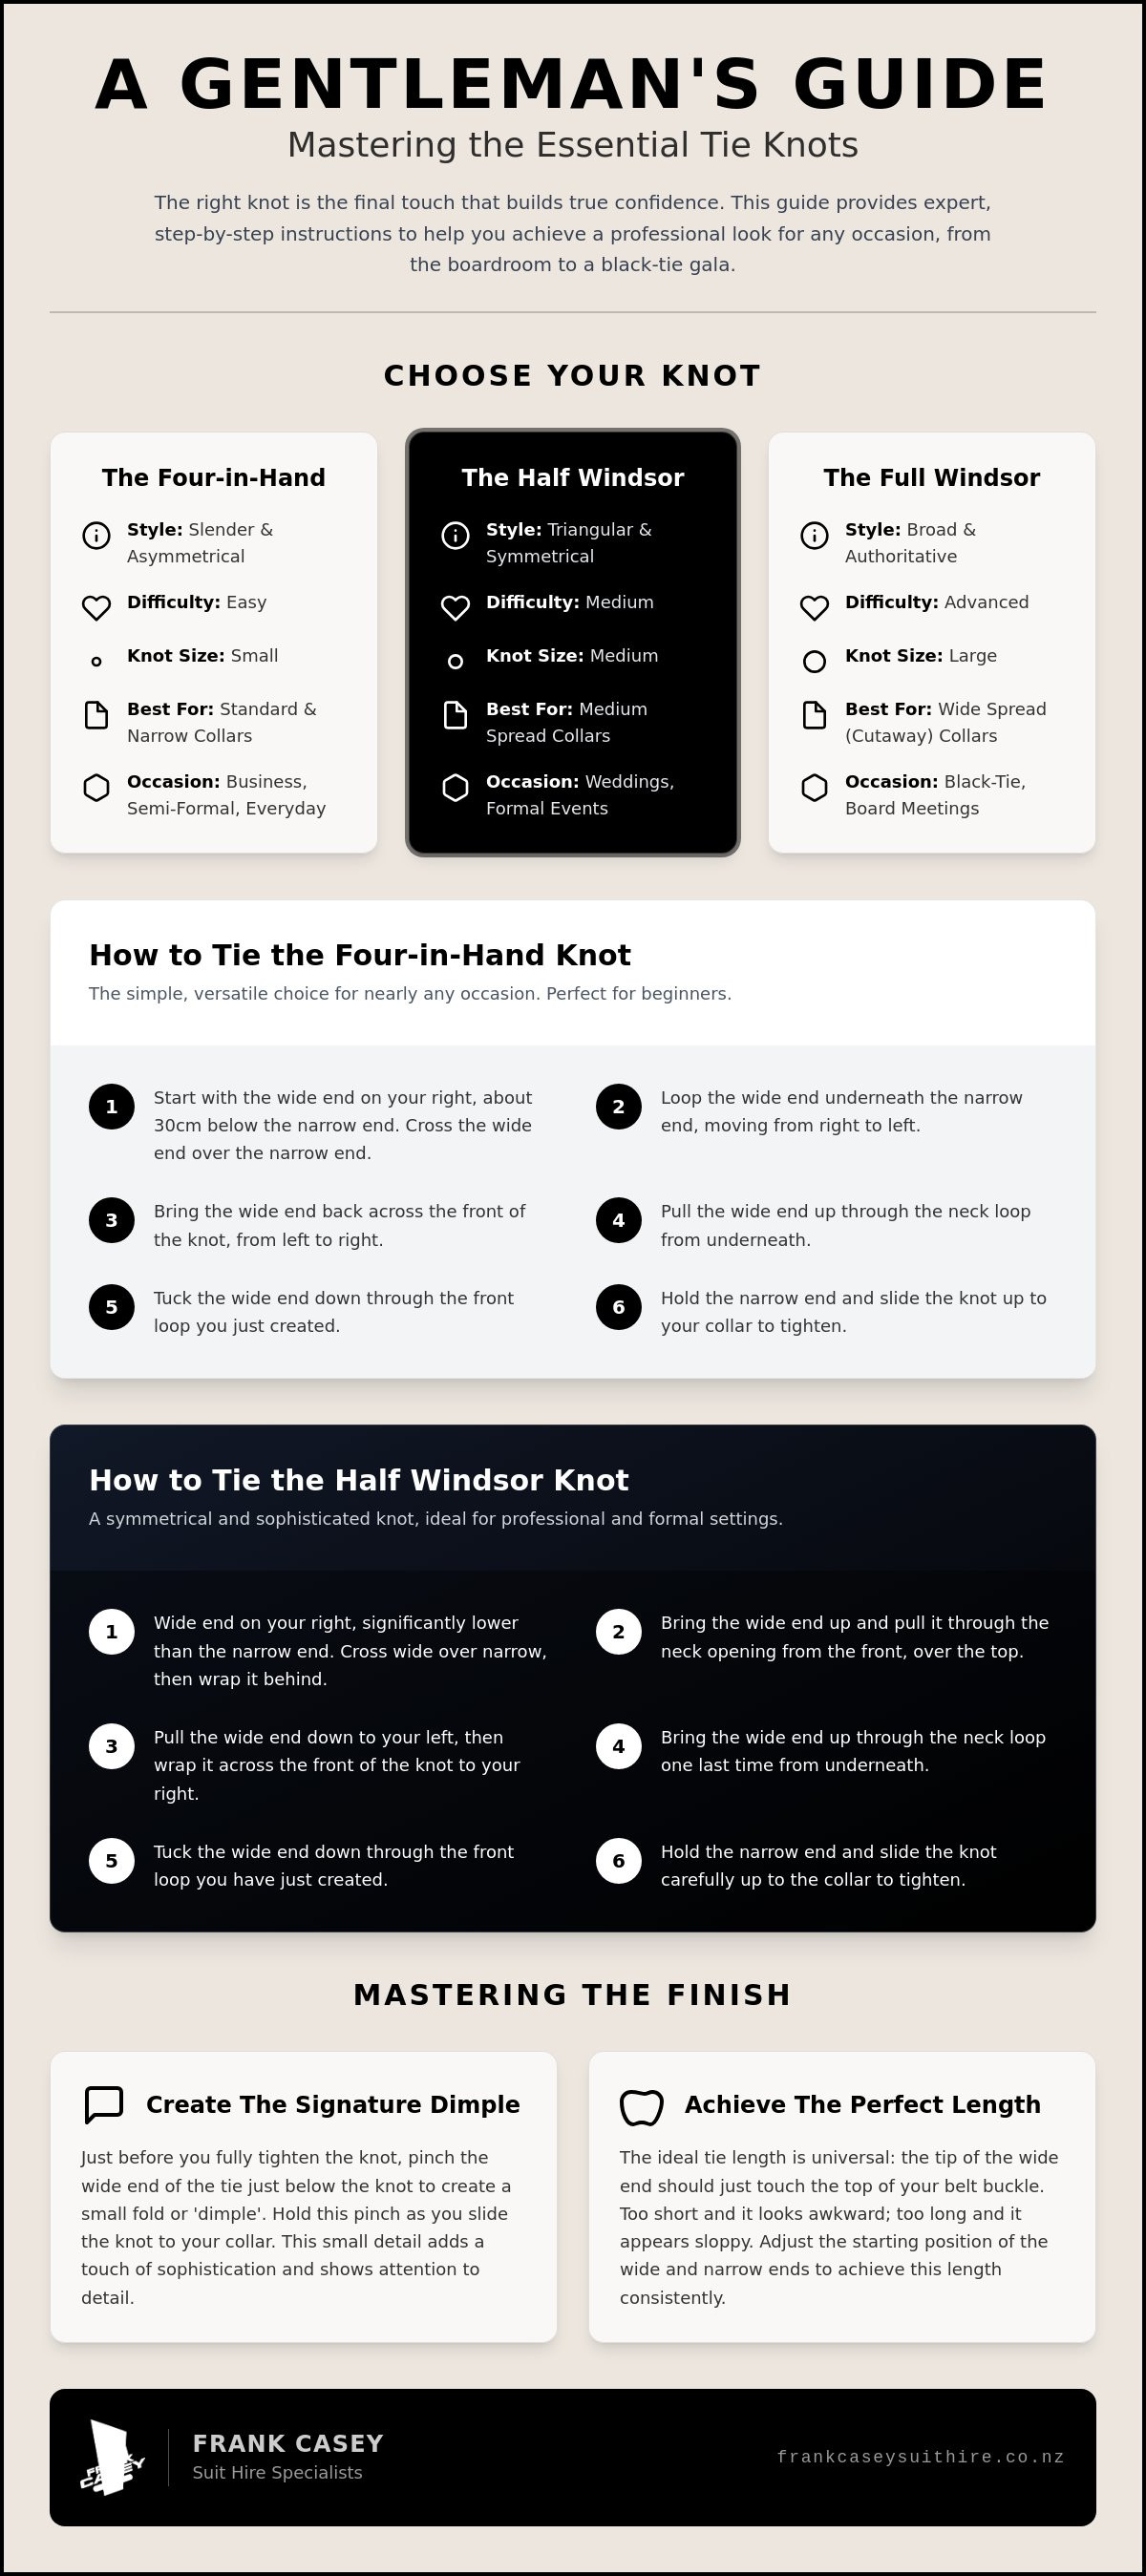
- Start with the wide end of the tie on your right side. It should extend about 30cm below the narrow end.
- Cross the wide end over the narrow end.
- Loop the wide end underneath the narrow end, moving from right to left.
- Bring the wide end back across the front from left to right.
- Pull the wide end up through the neck loop from underneath.
- Tuck the wide end down through the loop you just created at the front.
- Hold the narrow end and slide the knot up to your collar.
When to Choose the Four-in-Hand
Precision isn't always about perfect symmetry. The charm of the Four-in-Hand lies in its slightly relaxed, off-centre appearance. This makes it an excellent choice for modern, streamlined suit silhouettes where a bulky knot would look out of place. It's also the best method for heavier fabrics like wool or knitted ties. These thicker materials naturally create a larger knot, so using a simpler technique prevents the neck area from looking cluttered or uncomfortable.
Use this knot for office days, semi-formal events, or when you're wearing a shirt with a narrower collar spread. It's the most forgiving way to learn how to tie a tie because it's easy to adjust and stays secure throughout the day. Whether you're at a business lunch in Wellington or a summer wedding in Napier, the Four-in-Hand keeps things sharp but approachable.
The Half Windsor Knot: Balancing Sophistication and Versatility
The Half Windsor is often considered the "Goldilocks" of neckwear. It provides a crisp, triangular shape that's more substantial than the Four-in-Hand but lacks the sometimes overwhelming bulk of the Full Windsor. This balance makes it an essential skill when learning how to tie a tie for professional environments or formal celebrations in New Zealand. It's the knot that says you've put in the effort without looking like you're trying too hard.
Unlike the asymmetrical style we discussed in the previous section, the Half Windsor is symmetrical. This symmetry projects a sense of order and authority, making it the standard choice for business suits and job interviews. It works best with medium-width ties, providing enough volume to fill the collar gap without pushing the collar points outward. For a deeper dive into the mechanics of different styles, The Art of Manliness guide to classic tie knots offers excellent visual references to complement these steps.
How to Tie a Half Windsor
Achieving a neat Half Windsor requires a bit more focus than simpler knots, but the result is worth the extra loops. It creates a sturdy knot that won't slip during a long day at the office or a full night on the dance floor.
- Position your tie so the wide end is on your right and hangs significantly lower than the narrow end.
- Cross the wide end over the narrow end, then wrap it behind.
- Bring the wide end up and pull it through the neck opening from the front.
- Pull it down to your left, then wrap it across the front of the knot to your right.
- Bring the wide end up through the neck loop one last time from underneath.
- Tuck the wide end down through the loop at the front.
- Tighten the knot and slide it up to your collar while keeping the narrow end steady.
The Best Collars for a Half Windsor
This knot is incredibly versatile, but it truly shines when paired with standard point collars and medium spread collars. It fills the space between the collar points perfectly, creating a balanced frame for your face. It's the ideal companion for a Frank Casey wedding suit, ensuring you look sharp from the ceremony through to the final speeches.
One thing to watch out for is fabric weight. While the Half Windsor is adaptable, avoid using it with exceptionally thick silk or heavy wool ties. The extra layers in the knot can quickly become too chunky, losing that refined triangular shape. For most silk and synthetic blends, however, it remains the most reliable option for a polished finish. If you're preparing for a significant milestone, picking out the right formal accessories can help you find a tie that knots perfectly every time.
The Full Windsor Knot: Achieving the Ultimate Formal Look
The Full Windsor is the undisputed king of neckwear. If you're looking for a knot that exudes authority and precision, this is the one. It creates a large, wide, and perfectly symmetrical triangle that sits boldly against the collar. Because of its substantial volume, it's the only real choice for wide-spread collars where a smaller knot would simply look lost. Mastering how to tie a tie with a Full Windsor is a rite of passage for many Kiwi men preparing for high-stakes corporate gala dinners or prestigious awards nights.
While many quick video tutorials focus on the double-loop technique, they often fail to mention that the scale of this knot must match your proportions. It's particularly effective for taller men or those with a broader chest, as the knot's size balances their frame. However, the extra wraps require significantly more fabric. For those who appreciate a visual breakdown of these mechanics, wikiHow's illustrated tie-tying guide provides a clear, fact-checked supplement to these instructions. The secret to a successful Full Windsor isn't just the loops; it's the starting length.
Mastering the Full Windsor Technique
The biggest mistake men make with this knot is ending up with a tie that's far too short. To avoid this, start with the wide end significantly lower than the narrow end, usually about 35cm to 40cm lower depending on your height. This accounts for the double wrap around the neck loop.
- Cross the wide end over the narrow end near the collar.
- Loop the wide end up through the neck opening and then down to the right.
- Pass the wide end behind the narrow end to the left side.
- Loop it up and over the neck opening again, pulling it down to the left. You should now have a symmetrical base on both sides of the narrow end.
- Wrap the wide end across the front from left to right to create the "bridge."
- Pull the wide end up through the neck loop from underneath.
- Slide the wide end down through the loop you just created at the front.
Styling for Black Tie and Corporate Awards
In New Zealand, the Full Windsor is a staple for events that demand the highest level of formality. It pairs exceptionally well with our range of Black Tie Suits and Wedding Suits, especially when you've opted for a shirt with a wide collar spread. To ensure the knot holds its crisp shape throughout the evening, use a high-quality silk tie from our collection of Formal Accessories. Silk has the natural "memory" required to maintain that sharp triangular structure. Always pull the knot tight to the collar; a sagging Full Windsor loses its professional impact immediately. It's a bold choice that signals you've mastered the finer details of formal etiquette.
Choosing Your Knot: Matching Ties to Collars and Events
Selecting the right knot is more than just a technical skill. It's about understanding how the geometry of your neckwear interacts with your shirt and the specific event you're attending. A common mistake is thinking any knot works for any tie; in reality, a small knot paired with a wide spread collar looks unfinished and unprofessional. When you master how to tie a tie, you also learn to read the room and dress accordingly.
The material of your tie also plays a significant role in the final result. Pure silk ties are the gold standard for formal events because they hold a crisp shape and allow for a sharp dimple. Polyester blends are durable and great for daily wear, while wool or knitted ties add texture but create much bulkier knots. If you're using a heavy wool tie, stick to simpler knots to avoid a collar that looks overcrowded and uncomfortable.
Knot and Collar Compatibility Guide
Your shirt collar provides the frame for your tie. Matching the volume of the knot to the space between the collar points is the secret to a balanced, professional look.
- Point Collar: These have a narrow opening. They're best paired with a Four-in-Hand or a Half Windsor to ensure the knot doesn't push the collar points out.
- Spread Collar: Designed with a wider gap, these collars demand more volume. Use a Half or Full Windsor to fill the space properly and maintain symmetry.
- Button-Down: Typically seen in more relaxed or semi-formal settings, these suit the Four-in-Hand for a classic, understated appearance.
Matching the Occasion
In New Zealand, different milestones call for different levels of formality. For School Ball Suits, the Four-in-Hand or Half Windsor offers a modern, youthful vibe that feels sharp without being overly stiff. These knots work well with slimmer ties, which are often preferred for a streamlined, contemporary silhouette.
For weddings, the Half Windsor is the reliable standard for grooms and groomsmen. It provides the symmetry required for professional photography while remaining comfortable for a long day of celebrations. However, if you're attending a prestigious Black Tie gala and opting for a necktie instead of a bowtie, the Full Windsor is the appropriate choice. Its bold, authoritative presence matches the gravity of high-end formal wear. If you're unsure which combination works best for your upcoming event, you can explore our range of formal accessories to find the perfect match for your suit style.
Mastering the Finish: Professional Tips for a Perfect Look
Learning the mechanics of how to tie a tie is just the beginning. The real secret to a high-end look lies in the final adjustments you make before stepping out the door. These small details ensure your knot stays secure and looks intentional rather than rushed. Whether you're wearing one of our Wedding Suits or preparing for a corporate gala, these professional finishing touches make all the difference in your overall silhouette.
Correct length is an area where many men struggle. The tip of your tie should just reach the centre of your belt buckle. If it sits above the waistband, it looks too small for your frame. If it hangs below the belt, it appears sloppy and oversized. Additionally, your knot must be snug against the collar. There should be no gap between the top of the knot and the shirt, and your top button should never be visible. This "tightness rule" ensures you maintain a crisp, authoritative appearance throughout the day.
Using Formal Accessories like tie bars or clips can help keep your look organised all night. Position the tie bar between the third and fourth buttons of your shirt. This prevents the tie from swinging or dipping into your meal while adding a subtle touch of polished personality to your ensemble. It's a practical addition that also serves as a style statement.
The Secret to the Perfect Tie Dimple
A flat knot often looks unfinished and flat. The "dimple" is that signature crease just below the knot that adds depth and catches the light. It's a small detail that signals you understand the nuances of formal wear and have mastered how to tie a tie with precision.
- As you tighten the knot, place your index finger in the centre of the tie fabric just below the knot.
- Pinch the sides of the fabric with your thumb and middle finger while slowly pulling the wide end down to tighten.
- This creates a professional "V" shape that adds texture and holds its form even after hours of wear.
Avoid These Common Tie Mistakes
Even with the right steps, a few common errors can undermine your appearance. Paying attention to these final checks will ensure you leave the house with total confidence.
- The "Too Short" Tie: If your tie ends up too short, you likely started with the wide end too high. Adjust your starting position based on your height and the specific knot you've chosen.
- The Visible Back Tail: Always use the loop on the back of the wide end to keep the narrow end hidden. It's a simple fix that prevents a messy, dual-layered look from the side.
- The Loose Collar: Always button your top button before you slide the knot up. Trying to tighten a tie against an unbuttoned collar never results in a sharp finish.
Ready to look your best? Book a professional fitting and hire your complete suit at Frank Casey.
Step Out with Confidence at Your Next Event
Mastering the art of the perfect knot is the final step in elevating your formal look. Whether you've chosen the versatile Half Windsor for a wedding or the bold Full Windsor for a corporate awards night, you now have the tools to ensure your neckwear is flawless. Remember that the secret to a professional finish isn't just knowing how to tie a tie; it's about the small details like the signature dimple and ensuring the length is exactly right for your height.
Frank Casey has been New Zealand’s leading suit hire specialist since 1987, helping Kiwis look their best for every significant milestone. We include professional fitting services with every hire to ensure your suit and accessories are tailored to your specific needs. With nationwide delivery available for all our formal wear, achieving a high-end look is simple and stress-free. Explore our range of designer suits and ties for hire today. You've mastered the knot; now it's time to own the room.
Frequently Asked Questions
How long should a tie be when finished?
The tip of your finished tie should rest exactly at the centre of your belt buckle. If the tie hangs below the waistband, it looks oversized and sloppy; if it sits too high, it can make your torso appear disproportionately short. Getting this right often requires a few practice runs to find the perfect starting position for the wide end based on your height.
Can I tie a tie while I am not wearing the shirt?
You shouldn't tie your tie while you aren't wearing the shirt because you lose control over the tension and final length. Tying it directly onto your buttoned collar ensures the knot sits flush against the shirt and the proportions are tailored to your neck. It is much harder to judge the correct length and dimple placement when the tie is in your hands rather than around your neck.
What is the easiest tie knot for a beginner to learn?
The Four-in-Hand is the easiest knot for any beginner to master. It involves the fewest steps and creates a versatile, slightly asymmetrical look that works for most semi-formal settings in New Zealand. Once you understand the basics of how to tie a tie using this simple wrap method, moving on to more complex symmetrical knots like the Windsor becomes much more intuitive.
Should I use a different knot for a skinny tie vs. a wide tie?
You should definitely vary your knot based on the width of your tie to maintain a balanced silhouette. Skinny ties are best paired with a Four-in-Hand knot to avoid a bulky, top-heavy appearance that can look out of place. Conversely, wider ties or those made from thicker silk often require the symmetry and volume of a Half or Full Windsor to fill the collar gap properly.
How do I get the "dimple" in my tie knot?
You achieve the perfect dimple by pinching the tie fabric just below the knot during the final tightening phase. Place your index finger in the centre of the wide end and use your thumb and middle finger to squeeze the sides together as you pull the knot up. This creates a sharp, professional crease that adds depth and a high-end finish to your Business Suits or formal wear.
Is it better to hire a tie or buy one for a one-off event?
Hiring a tie is often the better choice for one-off events because it ensures a perfect colour and fabric match with your hired suit. When you hire from a specialist, you get access to high-quality Formal Accessories that are professionally curated to match our Wedding Suits or School Ball Suits. It is a convenient way to ensure your entire look is cohesive without the expense of purchasing a tie you may only wear once.
What is the difference between a Half Windsor and a Full Windsor?
The main difference lies in the number of wraps and the resulting size of the knot. A Full Windsor involves extra loops through the neck opening on both sides, creating a larger, perfectly symmetrical triangle that suits wide-spread collars. The Half Windsor is slightly smaller and less bulky, making it a more versatile choice for most standard shirt collars and medium-width ties.
Do I need a different knot for a school ball vs. a wedding?
Your choice of knot depends more on your shirt's collar style and personal preference than the specific event. For School Ball Suits, many young men prefer the Four-in-Hand or Half Windsor for a modern, streamlined vibe. For a wedding, the symmetry of a Windsor knot is often preferred to ensure a traditional and polished appearance in professional photography. Both options are perfectly acceptable for any formal Kiwi event.


